The v1.1 update for the Top Down Stealth Toolkit is now live on the Unreal Engine Marketplace. Listed below is a brief documentation of all the blueprint classes that make up the toolkit. For more information, check out the official support thread in the Unreal Engine forums at: https://forums.unrealengine.com/showthread.php?97156-Top-Down-Stealth-Toolkit
BP_PlayerCharacter:
The player character class handles all the input logic for the toolkit. Core functionalities include character movement & sprint/stamina mechanics, contextual footstep noises, gadget activations, & aiming assists for gadgets that require manual target confirmations.
BP_PlayerController:
The player controller class is responsible for creation/deletion of high level HUD widgets as well as runtime HUD updates for mission timers. gadget buttons, etc. It also handles spawning of Aim Plane actor that is used for accurate cursor positioning for aim assists.
BP_PlayerHUD:
Initiates high level HUD state changes.
BP_TDSTGameInstance:
Stores information about the gadgets.
BP_TDST_GameMode:
The game mode class handles functions that keep track of gem collection, spawning of the Exit Point actors as well as the End Game logic. It also has optional support for activating vision arc optimizations, since having a lot of dynamically updating vision arcs is quite expensive. It is best to use the optimization features only if performance issues are evident as the cost of running this feature otherwise could reduce the performance slightly.
BP_PatrolAI_Parent:
The base class for AI patrol bots & parent class of BP_PatrolAI_Melee & BP_PatrolAI_Ranged. This class handles state changes & operational cost levels, while the linked Behavior Tree handles sensory input management. Other inbuilt functions include patrol waypoint calculations as well as updates to alert meters, both direct & peripheral. It also uses AI Perception to detect sounds & other default components to display bot state & peripheral alert status, while a custom vision arc component handles dynamic updates to the vision arc.
BP_PatrolAI_Melee & BP_PatrolAI_Ranged:
The melee class does not contain any additional threat detection/management logic apart from what it derives from the parent class, while the ranged class uses a custom laser tracker component to lock on to targets.
BP_AIController_PatrolAI:
Initializes the Behavior Tree & updates the blackboard values at runtime based on the bot state changes in BP_PatrolAI_Parent class.
BT_PatrolEnemyAI & BB_PatrolEnemyAI:
Handles the patrol bot behavior through various tasks & blackboard data based on the activation of different bot states. Also contains service to handle threat detection.
BTS_VisionCheck:
Handles threat detection logic for patrol bots by searching for player character at regular intervals & evaluating if it's within the direct or peripheral vision range. Uses distance, angular & line trace checks along with the hearing sense data from the AI perception component to determine the control bot states.
BTT_TakeAimAtTarget:
Activate laser tracking system for ranged bots to lock on to the active target.
BTT_CallEndGameLogic:
Calls the end game logic from the Game Mode.
BTT_EndCurrentPatrolCycle:
Ends active patrol cycle based on the patrol movement type.
BTT_ExecutePatrolMovement:
Issues move order to patrol bots based on the associated movement type.
BTT_MoveToTargetLocation:
Used by patrol bots to move to suspicious locations in investigation mode.
BTT_InspectCurrentLocation:
Used by patrol bots in investigation/alarmed state to search around a suspicious location. The number of sweep searches as well as speed can be changed easily by adjusting the parameters for the same.
BTT_KeepTargetInFocus:
Keeps the bot focused on the active target
BTT_SetActiveThreat:
Updates the blackboard value to store information about a new target.
BTT_SetNewPatrolLocation:
Calculates next patrol waypoint & sets target point actor at the location.
BTT_SetNewTargetLocation:
Set target point actor at target location & updates the blackboard with the new information.
BP_StationaryAI_Parent:
The base class for stationary AI bots & parent class of BP_StationaryAI_Camera & BP_StationaryAI_Turret. This class handles threat detection, state changes & operational cost levels, while leaving the behavior of the bot during different states, to the child classes. Similar to the patrol bots, the stationary bots also use a custom vision arc component that dynamically updates the vision arc based on overlapping obstacles.
BP_StationaryAI_Camera:
Handles surveillance movement for the camera bots. Also contains functionality to alarm nearby patrol guards, once it detects a potential target.
BP_StationaryAI_Turret:
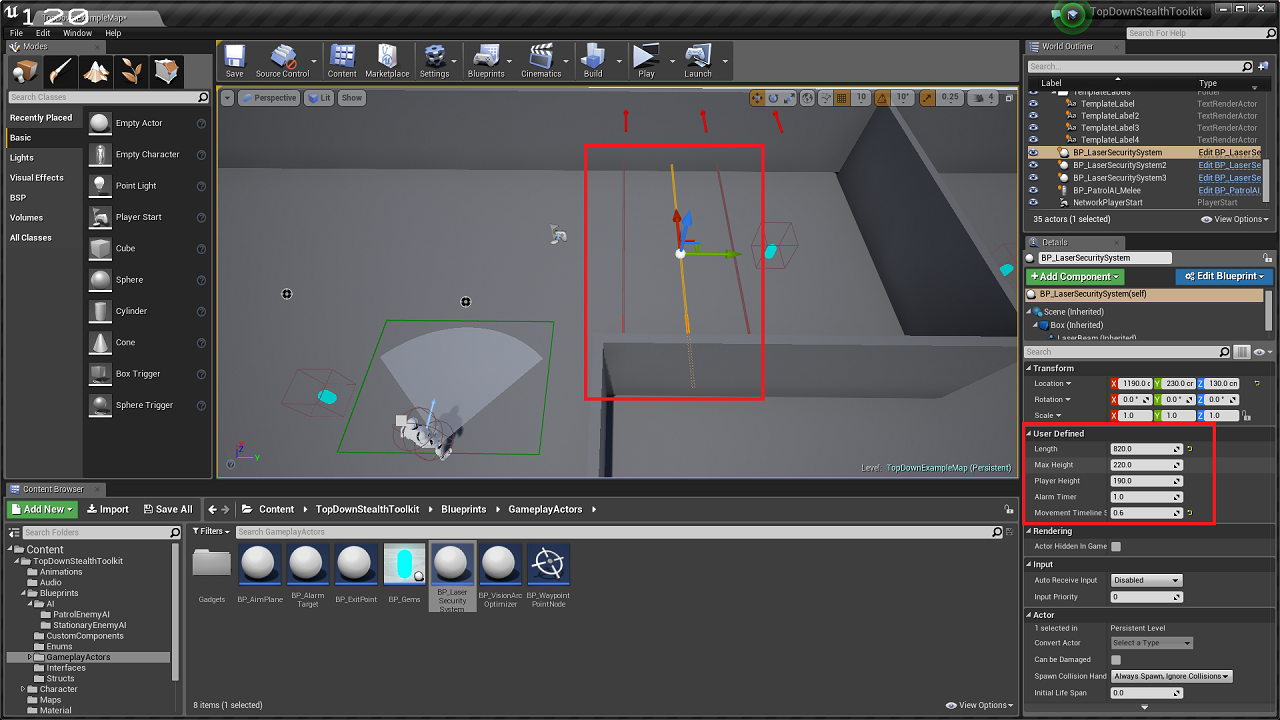
Uses an automated laser tracker component to lock on to targets.
BPC_AutomatedLaserTracker:
Custom component used by ranged offensive AI bots to lock on to a single target before firing a shot. Laser beam emitter used to display los to the target.
BPC_VisionArcVertexManager:
Custom component used by actors that require a Vision Arc. This component updates the individual vertices of the custom mesh components that make up the Vision Arc based on the obstacles in parent actor's vision range.
BP_AimPlane:
This actor is spawned at level start to retrieve the cursor location at positions higher than ground level (the normal hit result location) so as to provide the player with an accurate aiming assist while using gadgets that require manual targeting with the cursor. Does not contain any code within itself.
BP_AlarmTarget:
Disposable actor used by AI bots to trigger a noise alarm that attracts nearby AI bots to the actor's location.
BP_ExitPoint:
The Exit Point serves as the final objective for the player and gets activated by the Game Mode once the player has collected all the gems scattered throughout the level. Uses collision overlap to call end game logic.
BP_Gems:
Collectible actors that can be placed around the level and serves as one of the primary objectives of the game. The Game Mode keeps track of the collected gems as well as the total number of gems in the level & activates exit point based on this information. Uses basic overlap events to update the HUD & game mode once a gem is collected by the player.
BP_VisionArcOptimizer:
Determines if the vision arcs need to be rendered based on whether they're on screen or not. Can provide a significant performance boost if there are many actors with vision arcs in the level.
BP_WaypointNode:
Used as anchor points for pathing when movement type of patrol bots are set to 'FixedWaypoints'. Does not contain any relevant code within itself.
BP_ProximityShockMine:
Deployable gadget that uses basic collision overlap to temporarily deactivate the first patrol bot that ventures too close to the actor. Destroys itself once used up.
AnimBP_Parent & AnimBP_PatrolAI:
Basic animation updates based on the character velocity.
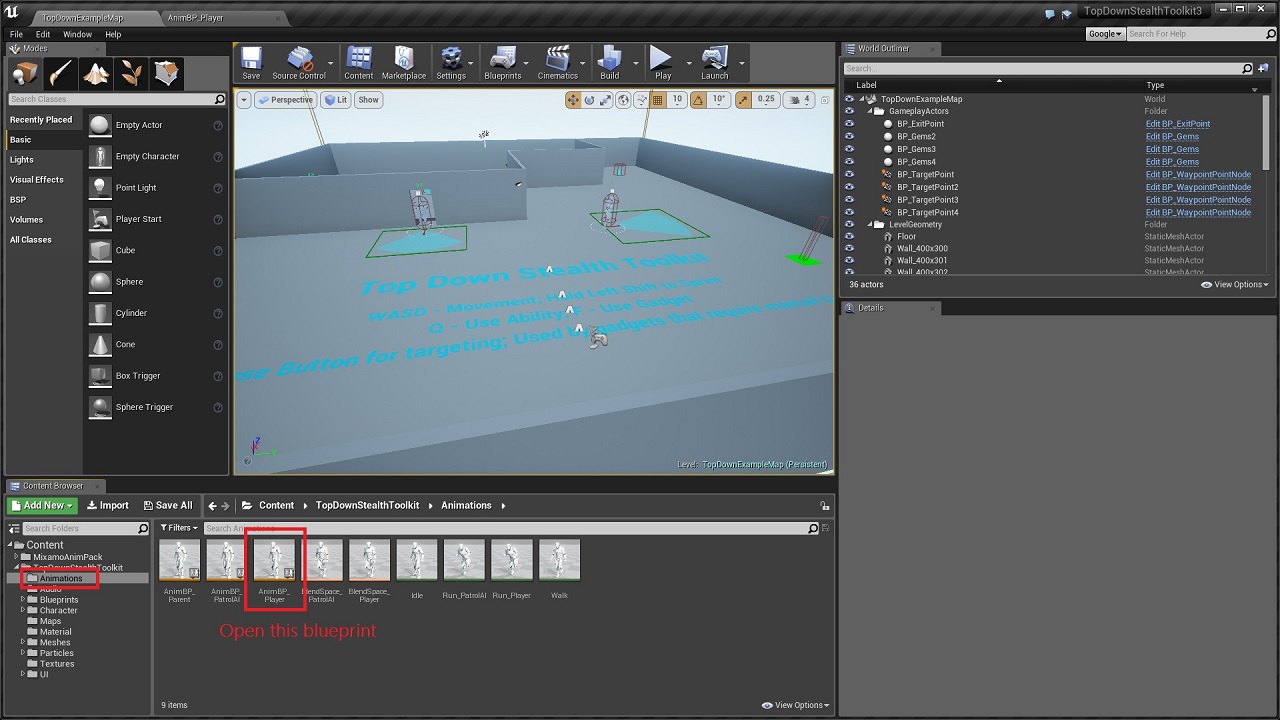
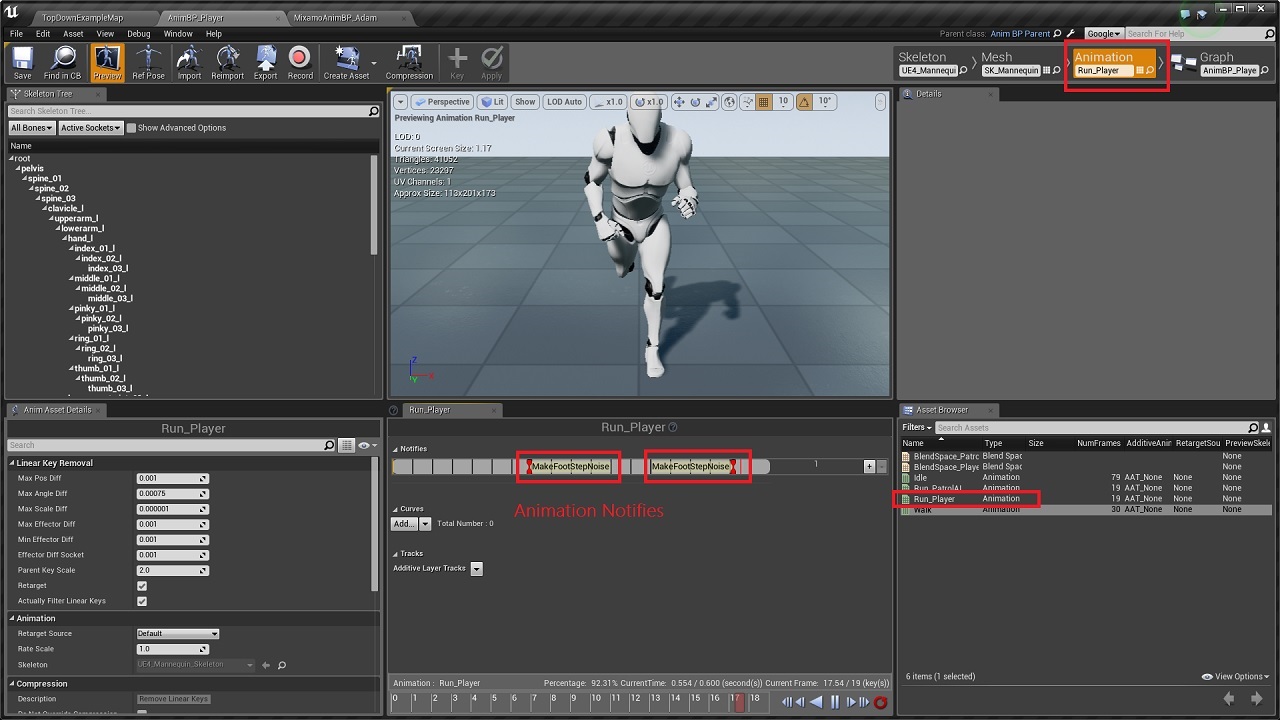
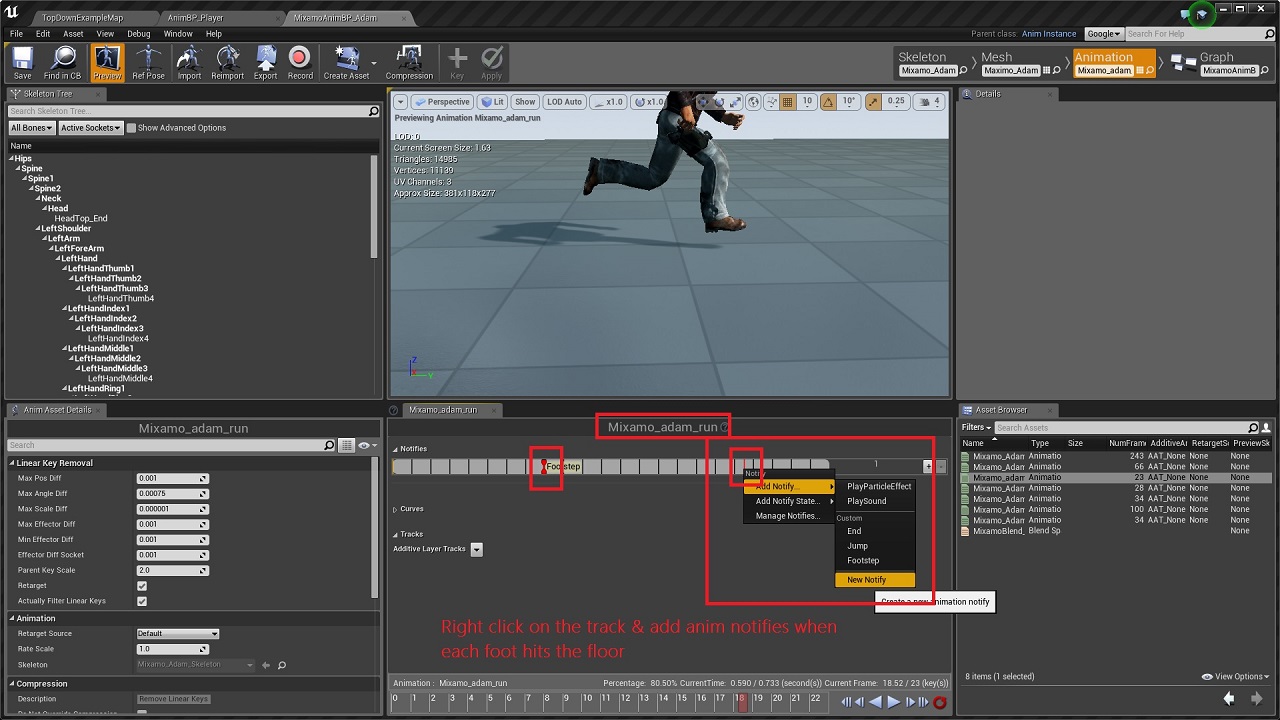
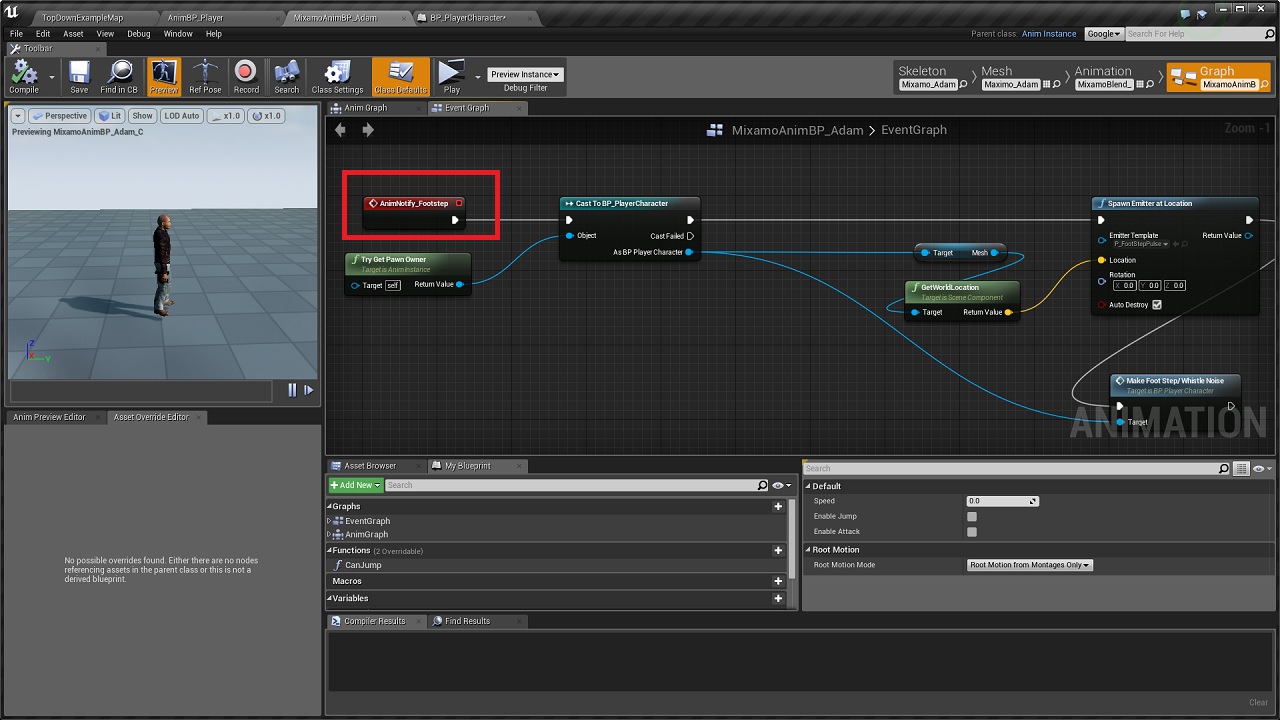
AnimBP_Player:
Basic animation updates based on the character velocity plus anim notifies to handle footstep noises while running.
BPI_TargetLockOnSystem:
Interface implemented by actors that use the Automated Laser Tracker component.
BPI_VisionArc:
Interface implemented by actors that use Vision Arc Vertex Manager component.
Widget_TopDownHUD:
The Top Down HUD handles all the major in-game HUD updates including HUD updates for stamina bar, gem collection stats, whistle & gadget button activations/state changes.
Widget_GameOverHUD:
Handles the end game UI interactions. Supports game restart & quit to desktop functionalities.
Widget_LoadoutMenu:
The Loadout menu enables the player to select a gadget from a list of all the gadgets specified in the gadget data array before starting the level.
Widget_GadgetsGridPanel:
Modular container panel that displays all the gadgets using a custom grid panel. It dynamically adjusts it's position & size based on the number of gadgets as well as set of parameters defined by the designer.
Widget_GadgetSelectionButton:
Enables selection of a gadget based on the associated button index within the Gadgets Data Array.
BP_PlayerCharacter:
The player character class handles all the input logic for the toolkit. Core functionalities include character movement & sprint/stamina mechanics, contextual footstep noises, gadget activations, & aiming assists for gadgets that require manual target confirmations.
BP_PlayerController:
The player controller class is responsible for creation/deletion of high level HUD widgets as well as runtime HUD updates for mission timers. gadget buttons, etc. It also handles spawning of Aim Plane actor that is used for accurate cursor positioning for aim assists.
BP_PlayerHUD:
Initiates high level HUD state changes.
BP_TDSTGameInstance:
Stores information about the gadgets.
BP_TDST_GameMode:
The game mode class handles functions that keep track of gem collection, spawning of the Exit Point actors as well as the End Game logic. It also has optional support for activating vision arc optimizations, since having a lot of dynamically updating vision arcs is quite expensive. It is best to use the optimization features only if performance issues are evident as the cost of running this feature otherwise could reduce the performance slightly.
BP_PatrolAI_Parent:
The base class for AI patrol bots & parent class of BP_PatrolAI_Melee & BP_PatrolAI_Ranged. This class handles state changes & operational cost levels, while the linked Behavior Tree handles sensory input management. Other inbuilt functions include patrol waypoint calculations as well as updates to alert meters, both direct & peripheral. It also uses AI Perception to detect sounds & other default components to display bot state & peripheral alert status, while a custom vision arc component handles dynamic updates to the vision arc.
BP_PatrolAI_Melee & BP_PatrolAI_Ranged:
The melee class does not contain any additional threat detection/management logic apart from what it derives from the parent class, while the ranged class uses a custom laser tracker component to lock on to targets.
BP_AIController_PatrolAI:
Initializes the Behavior Tree & updates the blackboard values at runtime based on the bot state changes in BP_PatrolAI_Parent class.
BT_PatrolEnemyAI & BB_PatrolEnemyAI:
Handles the patrol bot behavior through various tasks & blackboard data based on the activation of different bot states. Also contains service to handle threat detection.
BTS_VisionCheck:
Handles threat detection logic for patrol bots by searching for player character at regular intervals & evaluating if it's within the direct or peripheral vision range. Uses distance, angular & line trace checks along with the hearing sense data from the AI perception component to determine the control bot states.
BTT_TakeAimAtTarget:
Activate laser tracking system for ranged bots to lock on to the active target.
BTT_CallEndGameLogic:
Calls the end game logic from the Game Mode.
BTT_EndCurrentPatrolCycle:
Ends active patrol cycle based on the patrol movement type.
BTT_ExecutePatrolMovement:
Issues move order to patrol bots based on the associated movement type.
BTT_MoveToTargetLocation:
Used by patrol bots to move to suspicious locations in investigation mode.
BTT_InspectCurrentLocation:
Used by patrol bots in investigation/alarmed state to search around a suspicious location. The number of sweep searches as well as speed can be changed easily by adjusting the parameters for the same.
BTT_KeepTargetInFocus:
Keeps the bot focused on the active target
BTT_SetActiveThreat:
Updates the blackboard value to store information about a new target.
BTT_SetNewPatrolLocation:
Calculates next patrol waypoint & sets target point actor at the location.
BTT_SetNewTargetLocation:
Set target point actor at target location & updates the blackboard with the new information.
BP_StationaryAI_Parent:
The base class for stationary AI bots & parent class of BP_StationaryAI_Camera & BP_StationaryAI_Turret. This class handles threat detection, state changes & operational cost levels, while leaving the behavior of the bot during different states, to the child classes. Similar to the patrol bots, the stationary bots also use a custom vision arc component that dynamically updates the vision arc based on overlapping obstacles.
BP_StationaryAI_Camera:
Handles surveillance movement for the camera bots. Also contains functionality to alarm nearby patrol guards, once it detects a potential target.
BP_StationaryAI_Turret:
Uses an automated laser tracker component to lock on to targets.
BPC_AutomatedLaserTracker:
Custom component used by ranged offensive AI bots to lock on to a single target before firing a shot. Laser beam emitter used to display los to the target.
BPC_VisionArcVertexManager:
Custom component used by actors that require a Vision Arc. This component updates the individual vertices of the custom mesh components that make up the Vision Arc based on the obstacles in parent actor's vision range.
BP_AimPlane:
This actor is spawned at level start to retrieve the cursor location at positions higher than ground level (the normal hit result location) so as to provide the player with an accurate aiming assist while using gadgets that require manual targeting with the cursor. Does not contain any code within itself.
BP_AlarmTarget:
Disposable actor used by AI bots to trigger a noise alarm that attracts nearby AI bots to the actor's location.
BP_ExitPoint:
The Exit Point serves as the final objective for the player and gets activated by the Game Mode once the player has collected all the gems scattered throughout the level. Uses collision overlap to call end game logic.
BP_Gems:
Collectible actors that can be placed around the level and serves as one of the primary objectives of the game. The Game Mode keeps track of the collected gems as well as the total number of gems in the level & activates exit point based on this information. Uses basic overlap events to update the HUD & game mode once a gem is collected by the player.
BP_VisionArcOptimizer:
Determines if the vision arcs need to be rendered based on whether they're on screen or not. Can provide a significant performance boost if there are many actors with vision arcs in the level.
BP_WaypointNode:
Used as anchor points for pathing when movement type of patrol bots are set to 'FixedWaypoints'. Does not contain any relevant code within itself.
BP_ProximityShockMine:
Deployable gadget that uses basic collision overlap to temporarily deactivate the first patrol bot that ventures too close to the actor. Destroys itself once used up.
AnimBP_Parent & AnimBP_PatrolAI:
Basic animation updates based on the character velocity.
AnimBP_Player:
Basic animation updates based on the character velocity plus anim notifies to handle footstep noises while running.
BPI_TargetLockOnSystem:
Interface implemented by actors that use the Automated Laser Tracker component.
BPI_VisionArc:
Interface implemented by actors that use Vision Arc Vertex Manager component.
Widget_TopDownHUD:
The Top Down HUD handles all the major in-game HUD updates including HUD updates for stamina bar, gem collection stats, whistle & gadget button activations/state changes.
Widget_GameOverHUD:
Handles the end game UI interactions. Supports game restart & quit to desktop functionalities.
Widget_LoadoutMenu:
The Loadout menu enables the player to select a gadget from a list of all the gadgets specified in the gadget data array before starting the level.
Widget_GadgetsGridPanel:
Modular container panel that displays all the gadgets using a custom grid panel. It dynamically adjusts it's position & size based on the number of gadgets as well as set of parameters defined by the designer.
Widget_GadgetSelectionButton:
Enables selection of a gadget based on the associated button index within the Gadgets Data Array.